Cloudflare is a popular platform for enhancing website security, performance, and reliability through its proxy services and global CDN. However, there are times when you might need to disable Cloudflare’s proxy (to access your origin server directly) or purge its cache (to ensure visitors see the latest version of your site). Common scenarios include troubleshooting server issues, testing configurations, or resolving cached content conflicts. This guide will walk you through the steps to disable Cloudflare’s proxy.
Step by Step Guide!
Disabling Cloudflare Proxy
- Step 1: Log in to your Cloudflare dashboard.
- Step 2: Navigate to the DNS section under your domain’s settings.
- Step 3: Locate the DNS record (e.g., A, CNAME, or AAAA) you want to modify.
- In this Example, we are disabling it for an A record of our SubDomain.
- Step 4: Toggle the orange cloud icon from Proxied (cloud lit) to DNS Only (cloud grayed out).
- Step 5: Click Save.
- Note: Changes may take a few minutes to propagate. Your site will now bypass Cloudflare’s proxy, exposing your server’s IP address.

Validate the DNS records propagation
There are multiple ways to validate the mapped DNS records after disabling the Cloudflare proxy. The easiest and valid option is to use an online utility like this one, which is my favorite www.whatsmydns.net
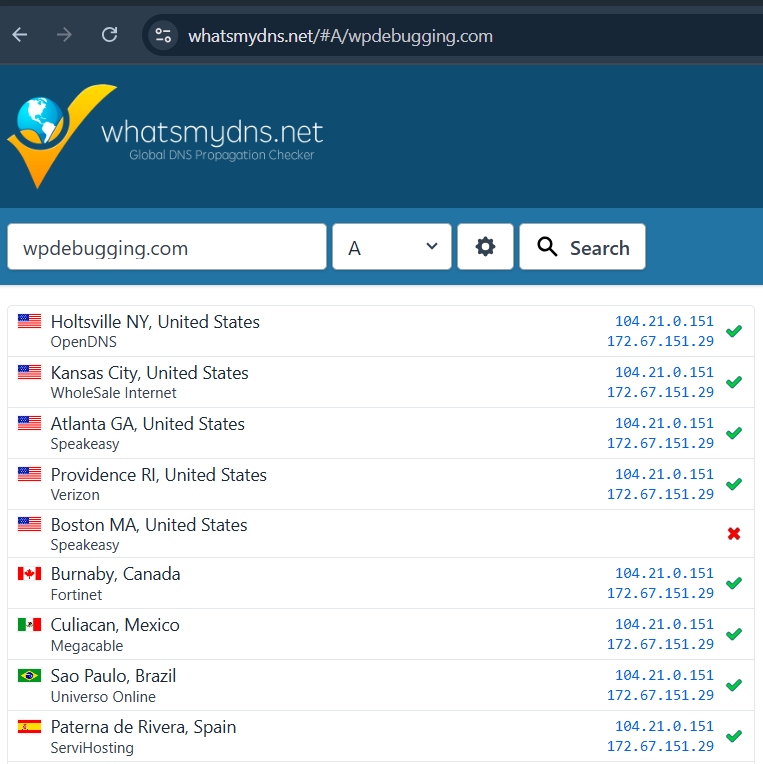
Note: In the screenshot above, the domain is still showing the Cloudflare proxy IP, which indicates that the DNS records haven’t fully propagated yet. In such cases, wait a few minutes and recheck. Once DNS propagation is complete, it will display the actual host IP address instead of the Cloudflare proxy.
Important Considerations!
- Exposed Host IP: Disabling Cloudflare’s proxy means your origin server’s IP address becomes publicly visible. This exposes your server to potential DDoS attacks, brute-force attempts, or targeted exploits. Always re-enable the proxy ASAP to restore anonymity and protection.
- SSL/TLS Implications: Cloudflare’s proxy provides SSL/TLS encryption by default. Disabling it may break HTTPS if your origin server lacks a valid SSL certificate. Ensure your origin server has a certificate (e.g., Let’s Encrypt) configured to avoid “insecure connection” warnings for visitors.
- Downtime Risk: Bypassing Cloudflare removes its CDN, DDoS mitigation, and firewall protections. Your site may experience slower load times or become vulnerable to attacks until the proxy is re-enabled.
- Re-Enable Proxy ASAP: Once troubleshooting or updates are complete, toggle the proxy (orange cloud) back on to restore security, performance, and SSL support.
Conclusion
Disabling Cloudflare’s proxy and purging its cache are powerful tools for developers, but they come with trade-offs. Exposing your origin server’s IP and losing SSL/TLS encryption (if not properly configured on your origin) can leave your site vulnerable. Always weigh the urgency of direct server access against the risks of reduced security and performance.
After completing your task, re-enable Cloudflare’s proxy immediately to reinstate DDoS protection, CDN benefits, and seamless SSL. For additional security, consider leveraging tools like Cloudflare Turnstile, a privacy-preserving alternative to CAPTCHA, to protect forms and login pages from bots while maintaining a smooth user experience.
Pro Tip: Secure Your Site Post-Reactivation
Once Cloudflare’s proxy is back online, take your security a step further with Cloudflare Turnstile. This free tool helps block bots from abusing forms, logins, or API endpoints—without annoying CAPTCHA puzzles. It’s simple to implement and works seamlessly with Cloudflare’s existing security suite.
🔗 Learn more: Cloudflare’s Turnstile.